July 31, 2011

Hummus with Jalapeño

Hummus is one of those appetizers that almost everyone loves. Its great with Pita Chips or even with veggies. I only made my first hummus a few months ago after I finally got around to buying some chickpeas and tahini. All other ingredients are basic staples in my pantry. One of my favorite store bought hummus is sabra, particularly the Jalapeno flavored one. So my take on hummus is adding some pickled jalapeño slices to add that spicy kick. Since I made this particular version for a friends party, I took it easy with the jalapeños since I wasn't sure if everyone going would love the spicier version of it.


Ingredients:
15.5 oz. can chickpeas
3 tbsp. tahini
2 garlic cloves
1 tsp. salt
1 tsp. pepper
1/3 cup olive oil
1/3 cup water
Juice of 1 lemon
4- 6 slices of jalapeño


In a food processor, mix the fully drained chickpeas, tahini and garlic cloves with the water until ingredients start blending together. Add the salt, pepper and lemon juice and pulse a few times. Slowly start adding the olive oil until it is fully blended and smooth. Add the jalapeños and keep pulsing until desired taste.

Feel free to add more garlic or olive oil as needed. Place in bowl and sprinkle some paprika or cayenne pepper for additional heat and drizzle some olive oil over it.

July 26, 2011

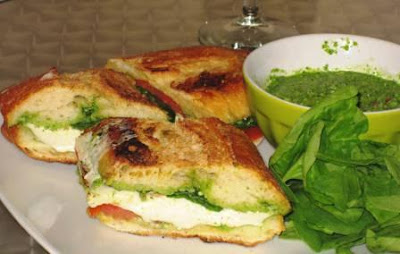
Caprese Sandwich with Spinach Pesto

A few weeks ago we opted for fancy sandwiches as dinner since we had a surprise party we had to be at. We wanted something fun and simple, so we decided to make a sandwich out of a Caprese salad. We replaced the basil for spinach and made a quick spinach pesto. This is a great simple recipe that you can make in a matter of minutes, and is really very satisfying.

Ingredients: 
1 Ciabatta Loaf
4-6 oz fresh mozzarella cheese
1 tomato sliced
2 cups fresh spinach leaves
1 tbsp pine nuts
1 large garlic clove
1 /4 cup olive oil
Balsamic Vinegar
Salt & Pepper
1 tbsp pine nuts


First we start off by making the spinach pesto. In a food processor add about 1 1/2 cup spinach. Add 1/4 cup olive oil, and garlic clove and pine nuts and pulse until well mixed. Add salt and pepper to taste.

Next we assemble. Slice the bread in half and spread the spinach pesto on both cut sides of the bread. Next you want to add a layer of sliced tomatoes. Next we slice the fresh mozzarella into about 1/4" thick slices and place over the layer of tomatoes. Drizzle olive oil, and a little balsamic vinegar over the mozzarella, then add a layer of fresh spinach. Close sandwich and press down. You want to cook this for several minutes on each side so the bread gets nice and toasty and the mozzarella starts melting.

July 25, 2011

Sauteed Mushroom and Shallots

After living in any given place for a long time, you can become very partial to certain flavors and methods of cooking. When it comes to steaks most of the time I prefer simple salt and pepper and grilled to perfection. But every once in a while I really enjoy a juicy steak topped by my favorite steakhouse toppers, particularly sauteed mushrooms.Feel free to use your favorite type of mushroom, I prefer cremini and button mushrooms.

Ingredients:
8 oz. Mushrooms
1-2 Shallots (depending on size)
2 tbsp butter
Salt & Pepper

With a paper towel, wipe all the mushrooms clean. Make sure you don't use a damp cloth. Mushrooms are like sponges, so we don't want to add any more moisture in them. Once cleaned, slice all your mushrooms and shallots. In a large saute pan melt the butter, and add shallots. When the shallots are translucent add the mushrooms and cook until they are golden brown. Serve immediately.

July 23, 2011

Zucchini Asparagus Salad

With the unbearable heat in NYC the last few days, I've been making lots of salads in lieu of side dishes. So I've been itching to make a fresh salad that was different than mixing some romaine or arugula with some other veggies and toppings.

I love zucchini and asparagus, and normally I eat these veggies cooked, but had recently seen this recipe on the food network and knew I had to try it out. It's so simple to make, as long as you have a little patience to get the zucchini shavings right.

Ingredients:
2 Zucchini
6 asparagus stalks 
Shaved Parmegiano Regianno
1/4 Cup Olive Oil
Juice of 1 lemon
Salt & Pepper to taste
1 tbsp of Champagne/white wine

Wash and slice the zuchinni in half, length-wise. With a vegetable peeler, cut thin ribbons of zucchini until almost at the skin. With the asparagus, break off the ends. (Rule of thumb, to see where to cut the end of the asparagus hold with both hands, and put pressure on the end side of it. Where it snaps off is where you want to cut the remaining asparagus stocks). Cut on a diagonal to thin strips, maybe 1/4" thick. Mix with zucchini strips.


To make the vinagrette, add the vegetable oil, lemon salt & pepper to a small bowl and mix well until slightly emulsified. Then add a tbsp of champagne, or white wine (whatever you have handy works) and mix again until fully blended. Pour over salad, and finish with fresh shavings of Parmegiano Regianno.

July 22, 2011

Roast Chicken

A few months ago I read this article around the time Gwyneth Paltrow's cookbook came out. I thought it was pretty funny that when asked what her ideal meal to win over her heart, her answer was: roast chicken, because that its almost impossible to f* up! I totally agree.

Roast chicken has to be one of my favorite comfort meals. I feel a lot of people are skeptical to dealing with a whole chicken, but in all honestly, its a cinch! The hardest part of it, is the cutting, which is really not that bad. Another reason some people veer away from making a whole chicken is they aren't sure when its done. My solution? Just buy a meat thermometer, and as long as you hit 165, you're good to go! Another way to be pretty sure, is to poke it with a knife, and if clear juices pour out vs. the pink juices, it's pretty much done.


Ingredients:
1 whole chicken
1 tbsp butter
3 cloves minced garlic
1 Lemon
3-4 sprigs thyme
2 sprigs rosemary
Salt & Pepper
1 beer


Pre-heat oven at 350 F. Make sure to remove any giblets from the cavity of the chicken before you start seasoning and place in center of the pan, breast down. Take 1/2 the tspn of butter and cut into little pieces. Lift the skin of the chicken and place little bits of the butter under the skin with 1/2 of the minced garlic and rub around. *This keeps the chicken moist and helps the browning of the skin. Salt and Pepper to taste, drizzle some olive oil over and squeeze 1/2 the lemon over. Flip so the breast is on top and repeat with remaining butter, garlic and lemon. Salt and pepper this side as well and loosely sprinkle with the thyme and rosemary. Also drizzle some olive oil on top. Cut the squeezed lemons into quarters and place in the cavity of the chicken. Open the beer, can or bottle and pour around the chicken, pour the last 1/4 into the cavity of the chicken. Place in oven and cook for around 1 hour and 15-30 minutes (may vary depending on the size of the chicken as well as your oven).

You should always check on the chicken every 20 minutes or so and baste it. (With a cooking brush, dip into the liquids and brush over the chicken). This helps to keep it moist as well as enhance the coloring and crunchy texture on the skin. Once it's done, let sit for 10 minutes before you start carving it out.

 This chicken was extremely juicy, but if you like to have a little sauce to go over it, use the left over juices in the roasting pan, place in a saucepan, and add a 1-2 tablespoons of cornstarch and whisk well over low heat. Nothing beats a great home-made pan gravy!

Scalloped Potatoes

I love potatoes, pretty much in any form. But I really have always loved the combination of textures that scalloped potatoes offer. They are a mix of creamy and buttery, sometimes a little cheesy, but always finished with that crunchy layer on top.

As much as I love scalloped potatoes, I don't make them very often, at least not during the work week. (Who really wants to spend all that time peeling the potatoes, to then finely slice them?) This week I finally got around to making a batch for my cooking class, since we had already done roasted and mashed potatoes before.

What I do find when comparing my version of these potatoes to other recipes is that I tend to favor a little "lighter version". Instead of doing a typical béchamel sauce and pouring that over the potatoes, I slightly cook the potatoes with some milk and a dab of butter prior to placing in the baking pan. Then I sprinkle a little cheese over each layer. Because potatoes have so much starch in them, I simply eliminate the flour in the béchamel mixture, and when the potatoes cook with the milk, they release natural starches that naturally thicken the milk and butter as they slightly cook.

 
Ingredients: 
6 medium Yukon Gold potatoes
3 Tbsp Butter
1 1/2 cups milk
3 Tbsp Creme Fraiche
6 sprigs of Thyme
4 oz. shredded gruyere cheese
Salt & Pepper to taste


Preheat the oven to 350 degrees F. Use non-stick spray in the inside of a 3-quart baking dish.
Slice the potatoes about 1/8 inch thick . I don't have a mandoline, but you can definitely use one. I like to slice 2 potatoes a time and place in 3 individual piles to have same sized layers.

In a large saute pan, add 1 of the 3 piles of potatoes, 1 tbsp butter and 1/2 cup of milk. Salt and pepper to taste as well. Slowly start cooking the potatoes in the milk and mix constantly. When the milk starts bubbling up add 1 tbsp of the creme fraiche and 2 sprigs of the thyme. Keep cooking until the mixture thickens slightly and pour into baking dish, spreading out the potatoes evenly. Sprinkle some cheese over the top. Repeat with other 2 bunches of sliced potatoes. Bake, uncovered, until the potatoes are fork-tender, and the top layer has a rich golden color. Let cool for 5 minutes before serving. (Feel free to use more cheese between layers and on the top!)


July 5, 2011

Chocolate Brownies

I've always loved easy to grab desserts such as cookies and brownies. What's not to love about them? I've been pretty consistent at making pretty great cookies for most of my life (as its noted in my profile!), but I've always had issues with brownies.

I have tried several brownie recipes from scratch and either came up with overly gooey brownies that looked more like fudge, or other recipes that yielded dry, crumbly cakey brownies. All this failure making brownies constantly had me turn into the boxed versions to get the consistency that I always yearned for. That is until I came accross this recipe. I had seen several other blogs comment on this Bon Appetite recipe for what may of them called "The Best" brownies ever. 

So I tried them, and I most definitely agree, these are THE BEST brownies I've ever made! I followed most of the recipe, the only difference is I didn't add any walnuts. I also added some course kosher salt sprinkled on top prior to baking. I highly encourage you to try this recipe out, I've made them 3 times, and they NEVER last more than a few hours! They are everything you want in a brownie too, they are soft inside, slighly chewey and most importantly heavenly chocolatey!

Ingredients:
Nonstick vegetable oil spray
10 tablespoons unsalted butter
1 1/4 cups sugar
3/4 cup natural unsweetened cocoa powder 
1 teaspoon vanilla extract
2 large eggs, chilled
1/3 cup plus 1 tablespoon all purpose flour


Position rack in bottom third of oven; preheat to 325°F. Line 8x8 or 7x11  inch metal baking pan with foil, pressing foil firmly against pan sides and leaving 2-inch overhang. Coat foil with nonstick spray. Melt butter in medium saucepan over medium heat. Continue cooking until butter stops foaming and browned bits form at bottom of pan, stirring often, about 5 minutes. Remove from heat; immediately add sugar, cocoa, 2 teaspoons water, vanilla, and 1/4 teaspoon (generous) salt. Stir to blend.

Let cool 5 minutes (mixture will still be hot). Add eggs to hot mixture 1 at a time, beating vigorously to blend after each addition. When mixture looks thick and shiny, add flour and stir until blended. Beat vigorously 60 strokes. Transfer batter to prepared pan. Sprinkle a little coarse kosher salt over the mixture. Bake for 25 minutes. Make sure to let cool for several hours before cutting into squares.

July 3, 2011

Frittata

This week as part of our weekly cooking club we took full advantage of the long weekend to make a brunch in lieu of our standard dinners. We had originally planned it as a fun "boozy brunch", but after a long night out, we ended up with fewer people than anticipated and opted for a booze-free brunch instead. The result, just as fun and so tasty. We made, possibly the best frittata possible for 2 first time frittata makers!

If you've never made a frittata, no worries- its WAY easier than making a pretty looking omelet! For those who aren't sure what a frittata even is, its essentially an Italian version of an omelet. Same basic method for cooking the eggs with whatever fillings you like, but instead of flipping it, you finish it off in the oven, which is why I think its easier than making an omelet. (I rarely make a properly folded omelet, they always end up more like a scramble). I just want to point out that it does take almost 45 minutes to an hour for the entire process, but if you've got the time and can hold off the hunger, trust me its worth the wait!
Whole Frittata

Ingredients:
8 large eggs
1/4 cup milk
1 tsp salt
1 tsp pepper
1/2 tsp papprika
5 asparagus stocks cut to 1/2 inch pieces
1 large scallion finely sliced
1/2 large tomato diced
2 slices prosciutto di parma, cut into thin strips
6-8 basil leaves, cut into thin strips
Mozzarella bufala (about 4 oz)

Pre-heat your oven to 350 F. Cut asparagus, scallions, tomatoes, prosciutto and basil leave and place in a medium bowl and set aside. In a large bowl blend together all eggs and milk. Add salt, pepper and papprika and mix well. Spray onto a large oven-safe skillet (about 10") some non-stick cooking spray. Melt 1 tbsp of butter in skillet and add egg mixture. Cook over medium heat for a few minutes for the base to set. Add vegetable mixture and spread evenly over entire pan. Mix gently into egg mixture, you don't want to beat it. 

With a silicone spatula, lift the edges of the egg mixture once it starts to set. You want to make sure the egg sets well prior to placing into the oven. Essentially the edges should lift easily, but have a little color on the edges. Place into the oven and cook for about 6 minutes. Remove after the eggs started to set slightly and then add the mozzarella cheese. You can either slice them or break up the cheese and have little dollops all around the frittata. Place back in the oven and cook for another 30-40 minutes. The time on this can really vary, but you want the frittata to puff up, and have the eggs cook thru. Remove from the oven and let sit for a few minutes prior to cutting.

Frittata Slice: asparagus, prosciutto, scallions, tomato, basil & mozzarella

Limber de Coco (Coconut Cream Popsicles)

One of my favorite things to eat while we visited my grandmother every summer in Puerto Rico, were her next- door neighbors limbers. A limber, is essentially a flavored ice pop, but my favorite has always been coconut. Traditionally they are not poured in actual ice pop molds, but made in either ice cube molds or it dixie cups. These popsicles are different to most, as they are a little creamy, with little bits of coconut texture without being overwhelmed by the coconut flakes. They also include cinnamon which should almost always go hand in had with anything coconut flavored.

Ingredients:
1 can evaporated milk
1 can coconut milk
1/2 cup sugar
1/2 cup shredded coconut flakes
2 tsp. vanilla extract
1 tsp cinnamon

Place all ingredients into a blender. Don't add any ice, these are NOT daiquiris' as we'll be freezing them over night. Blend on medium for about 3 minutes. Make sure that the coconut flakes have broken down, this helps get a creamier texture. Pour thru a sieve, to have a smooth but creamy texture and pour into Popsicle molds. (Feel free to use plastic dixie cups or ice cubes too!)

If you want an "adult" version of these you could always add a tbsp of rum as a decadent treat! And if you're concerned about the waistline, feel free to use fat free or low fat options for the evaporated milk and coconut milk.